


Industry News
Let’s assume you have a working CNC machine that you’ve just acquired, but that you know very little about CNC. Let’s further assume it is a mill and that you will primarily be focused on cutting metal. You’re probably ready to start milling custom chopper parts, build a tool changer, or maybe scratch build a Colt 1911 handgun. With CNC, you can build almost anything and you’re chomping at the bit to get started on your pet projects.
Not so fast! Remember, you just got the machine and you’re a beginner. You’re not ready for those projects yet.
If you have some idea how to make your first CNC parts, charge ahead with these 10 suggestions. If you don’t, and want to see the whole process of making a part mapped out in detail, take a break and go read our Beginner’s Step-By-Step Guide to Making CNC Parts. It will fill in those hazy details you’ve been wondering about, then, you’re ready for this article.
Here are 10 things you should focus on to maximize your chances of becoming quickly successful:
1. Buy Some Decent Cutters
Don’t get the package of assorted sizes of imported Chinese cutters of indeterminate quality. You don’t need the solid green unobtanium aerospace cutters from Men-In-Black-Cutter-Supply, just get some decent cutters from a reliable source that has reasonable prices like Maritool.com. Try for a name brand, perhaps one that’s on sale at a supplier like Enco. Knowing you have a reasonable cutter eliminates a whole bunch of variables that govern your success or failure. I would also go with HSS when you’re just starting out. You’ll eventually want carbide for a lot of uses, but HSS is cheaper and more forgiving. Get yourself a few sizes:
– 1/2″
– 1/4″
– 3/16″
Nothing smaller at this stage until you’ve learned on less delicate cutters. Buy 2 or 3 flutes for aluminum and some 4 flutes for steel. I’d get 3 of each in each size to start. You are going to break some cutters, so just get over it and be used to the idea. It’s a good thing at this stage to remind you to wear your safety glasses because you will break some cutters!
While you’re at it, buy a full twist drill assortment. HSS from a decent brand on sale will work fine. I like the idea of replacing the ones I break with cobalt over time.
2. Get a Decent Vise, a Clamping Kit, and a set of Parallels
Yeah, I know, vises are expensive, but workholding is very important. Get a decent Kurt-style vise for your mill, it’ll be money well spent on a valuable piece of tooling that will last for years. In my shop I have used Kurts purchased from eBay and a couple of brand spankin’ new Glacern vises. There is sneaky stuff that goes on when you clamp a workpiece into the vise. If you don’t have a good one, the workpiece will shift and you’ll be wondering what happened.
You’ll need a way to mount your vise to the T-slots of your table, so you may as well get a clamping kit too. Any old kit will do. Buy the one that is on sale at Enco or some place similar.
Lastly, you’ll need a set of parallels, at least until you get proficient at making step jaws.
3. Get yourself a misting setup for coolant and use it while being paranoid about chip buildup
If your machine didn’t come with flood coolant, and isn’t set up for it, get yourself a misting setup. I got mine off eBay for about $100. It’s a Noga. There are a lot of different brands. Get a jug of coolant to go with it. I use KoolMist, but again, there are a lot of brands. Now train yourself to be paranoid about chip buildup. Recutting chips is bad for cutters and in the worst case leads to breakage. Being paranoid means you’re watching the cut like a hawk and you fiddle with your mister’s nozzle until you figure out how to position it right the first time and every time thereafter to blow away the chips from the cut. Learn more about the different CNC Coolant options.
4. Learn how to use MDI
Your next step is to learn to run your CNC as though it was a manual mill with power feeds and DRO’s on every axis. In the process you’ll learn some basic g-codes so that you have some idea what your program is doing the first time you run a real g-code program (that’s a little ways away yet!). It’s very convenient to be able to do this trick, and you can learn all about it through the CNCCookbook G-Code Tutorial. Read the first 4 chapters and you’ll be ready to start playing with MDI. Start out with the cutter way high and don’t try make any moves in the Z-axis so you won’t crash the cutter into anything. Practice making moves in X and Y. Until the cutter goes where you want it to and you’re not making mistakes. One more trick: don’t use G00 in MDI–that makes the machine move in rapids mode which is as fast as it can go. Use G01 and set a relatively slow feedrate. “G01 F20” will make the machine move at 20 inches per minute (or metric units if you’re in metric). You’ll have a lot more time to react this way if it starts heading into trouble. Visualize pressing the red E-Stop many times so it’ll be almost automatic when you need it.
5. Get yourself a feeds and speeds calculator and use it

You’re getting close to making your first cuts, so why not do yourself a favor and get a feeds and speeds calculator so you can make sure your spindle speeds and feedrate are perfect for that first cut?
Rules of thumb and setting up by ear have little place in CNC, though they can work out okay but not optimally for manual machining. CNC is a much tougher work style for cutters than manual machining is. It’s much more dependent on you to get your feeds and speeds right from the get go. So get a Feeds and Speeds Calculator. We recommend our own CNCCookbook G-Wizard feeds and speeds calculator (natch!). It doesn’t cost much more than 1 single cutter to get started, and you can use it for 30-days completely free.
Best of all, there’s a great deal just for beginners and hobbyists that we call “G-Wizard Lite”:
When you subscribe for 1 year of G-Wizard, you get Lifetime use of the product for up to 1 horsepower. You can do a lot with 1 HP, especially if you’re a student or hobbyist.
In fact, it may be all the power you ever need!
So check it out, your cutters will thank you and your projects will go by faster and easier.
6. Get yourself a Z-height measuring gizmo and learn to use it to touch off your tool lengths. While you’re at it, get an Edge Finder and use it to touch off your Part Zeros.
Your machine needs to know where the tip of the tool is or terrible things can happen. As a beginner, you tell it by using a Z-height measuring gizmo of some kind. The gizmo will involve a needle that you lower the tool until the needle is zeroed, a touch plate, or you can even get by with a gage block. Learn how to use these to tell the machine what your tool length is. This process tells your machine where the tip is in Z. To establish the position of X and Y you’ll need and Edge Finder. The first thing you’ll do after sticking a piece of material in your vise and inserting a tool in the spindle is to set these zeros.
You can learn more about touching off and setting part zero from our G-Code Tutorial. Also take a look at our 2-part series on Tool Data Management for information on Z-Height Gizmos (more properly called touch setters) and tool lengths. Use your newfound MDI skills from #4 to start using your Edge Finder and Z-Height Touch Setter.
7. Learn to Tram your Mill and Vise
Hoss Trams a Mill–Pt 1
Tramming is what machinists call getting things square by sweeping an indicator around. It’s a basic skill everyone needs to learn. When you first start machining, get into the habit of checking your mill’s tram every time you walk out into the shop. You’ll know later on whether you need to do it every time, but for now, you could use the practice. While you’re at it, be sure you know how to tram your vise so the jaws are aligned properly with one axis or the other. Let’s don’t try to square you mill just yet, but tramming the mill and vise are a good step at this stage. For details on how to do this, refer to our Mill Tips and Techniques page.
8. Start out with aluminum, brass, and mild steel. Avoid stainless.
Okay, the very next step involves making some cuts. Sorry if it seems like you had to do a lot before getting there, but I did say I wanted to tell you some things that will help you succeed and there’s quite a few things in that category!
One more is to avoid difficult materials for your first cuts. Stick with aluminum or brass. When you’re doing okay there, graduate to mild steel. Only after you feel like you’ve pretty well mastered cuts in these materials, you’re not breaking or wearing cutters out too quickly, and your surface finishes no longer look like the material was attacked by a pack of rabies-infected beavers should you even consider a difficult material like stainless steel. Take a look around some metal supplier catalogs. Google up “Speedy Metals” for example (Google so you can see some other suppliers too) and look through their site. Get an idea what “Mild Steel” might be and the different shapes and materials that are available to you.
9. For your first project, learn how to square a block of material and make yourself a few sets of step jaws in aluminum

Let’s quit procrastinating and make some chips. For this step, you’re going to start by learning how to square a block of material. Get your saw and cut out some pieces of material that are slightly oversized to serve as vise jaws. Google “Kurt Vise Jaw Dimensions” to find drawings of jaws if you need some. As mentioned, cut the stock slightly oversized from aluminum. Now you need to square those blocks. Squaring means you will make a series of milling cuts until all sides are properly parallel or perpendicular to one another, at which point the workpiece is “square”.
The proper steps for squaring a block of material are described on my Turner’s Cube page. The recipe described there is one I got from the great book, “Machine Shop Trade Secrets.” Pick up a copy to continue your learning process.
One thing about the Turner’s Cube material squaring: I use a Face Mill, but you should start out doing it with multiple passes and a 1/2″ endmill. Why? Because Face Mills generate a lot of force. You can stall the spindle, yank the work out of the vise and throw it across the room, and other shenanigans a beginner could do without. Leave the face mill in a drawer if you have one already and do it with a 1/2″ endmill the first time until you know a little more what you’re doing.
Having squared the material, your next task is to cut it to size by continuing to mill it until it is a perfect fit for your vise jaws (you’ll need 2 square pieces, one for each jaw).
The last step is to drill and countersink the mounting holes.
Actually, I wasn’t completely truthful. Once you have mounting holes, the last step is to mill a step along each jaw, maybe 1/8″ square. Now you can use that step instead of parallels when you drop material into the vise. Over time, you’ll learn a lot more tricks with aluminum jaws, but remember: it all started here with your first set.
10. Graduate to CAD/CAM
Friend, you’re now able to do the basics. Sure, there’s a lot more learning to do, but you’re in a position to have a leg up on the manual machinist down the street who has a Bridgeport and no CNC. Your next step is to start pumping out the g-code. To do that, you’ll need to be proficient with CAD/CAM. This is going to be your biggest step yet. Neither CAD nor CAM is very easy to learn. I give myself 2 weeks to feel comfortable with a new program, and I’ve had the luxury of learning quite a few so far. If this is your first time, get ready to drink from the firehose. I wish I could give you a bunch of pointers to make it easy, but unfortunately it isn’t easy and every program is different. If you can, choose which programs you’ll use based on an ability to get help from someone. Ideally, help from a friend who already uses the software and is proficient. If not, consider a course at a nearby community college–it’ll be well worth the time and money spent. If you have no help available in your area, you’ll have to fall back on the Internet. Start by watching a bunch of videos. Try to follow along with your software if you can. Find the online forums where people go to get help with these programs.
I do have two thoughts to simplify this part of the learning curve. First, don’t learn CAD and CAM at the same time–it’s just too much. Start with CAM. Get to where you’ve drawn 6 to 12 parts in your CAD program and feel like you may not be the fastest CAD operator in the West, but you can get it to do what you need to do. Once you’ve reached that point, then start to learn CAM.
The thing about CAM is everyone thinks you load a drawing, push a button, and out pops g-code. Unfortunately, there is more to it than that. So my second tip is don’t make your first CAM software have to be the one you’ll use for life. The latter will lead you down the path of loading up on features, which means the CAM package will be even harder to learn. Right now you want the shortest path to making some parts. Later, you can consider whether your entry-level CAM needs an upgrade. You’ll be surprised at how far you can go with simple CAM though, so give it a chance. The absolute easiest to learn and use package I’ve ever come across is MeshCAM, bar none. That’s why it is an integral part of Carbide 3D’s Nomad CNC Mill for non-machinists. It’s also why I decided CNCCookbook should offer to sell MeshCAM to it’s visitors. We’ll make you a sweet heart deal, even through in a copy of our G-Wizard Feeds and Speeds Calculator at a great combination price. Check out MeshCAM for your first CAM software.
Our article on digital tooling might help. We also did a survey which can give you some idea of the relative popularity of the various CAM programs. Most of these programs have a demo or trial. Check them out.
Bonus: Delay the need for CAD/CAM a little while with Conversational CNC
Many talented manual machinists run afoul of CADCAM and it stalls their ability to be productive on CNC machines quickly. Even after they’ve learned CADCAM, they’re still left with the feeling that manual machining can make simple parts faster than CNC, because they don’t have to stop to make a CAD drawing and run it through the CAM package to get g-code. Instead, they can just make a simple bracket with 4 holes shooting from the hip. Conversational CNC makes it possible to do that with a CNC machine. Imagine changing the long essay test that is CADCAM to a quick multiple-choice quiz. That’s what Conversational CNC is all about. Here’s the pictorial menu of Conversational CNC operations that can be performed on a mill:
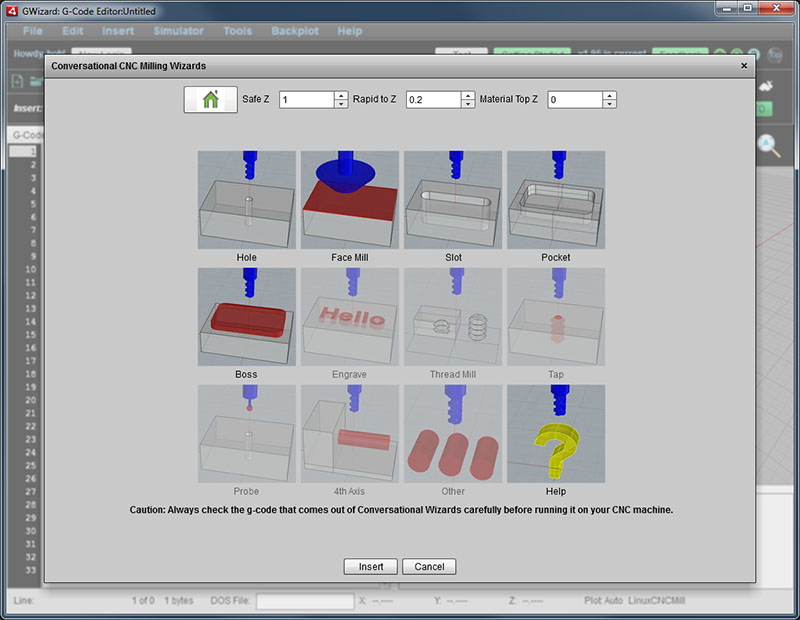
You pick the operation, a popup asks a few simple questions, you press the Insert button, and you’ve got your g-code. We’ve built Conversational CNC right into our G-Wizard Editor product so you won’t have to purchase an expensive stand alone Conversational package.
You’ll still need to learn CADCAM, but with Conversational CNC you can be making simple parts before finishing the CADCAM learning curve.
Congratulations, you’ve got some Basic CNC Skills!
Congratulations, you’ve learned enough to start doing some useful things with a little confidence. If you can design and generate g-code for basic parts with CAD/CAM software, you’re particularly proficient. But stay tuned because we’re going to follow up on this article in a week or two (okay, it took a lot longer than a week, but it got done!) with another installment of things you can do to reach the next level of proficiency. There’s always something more to learn–it’s one of the things that makes CNC so interesting!


